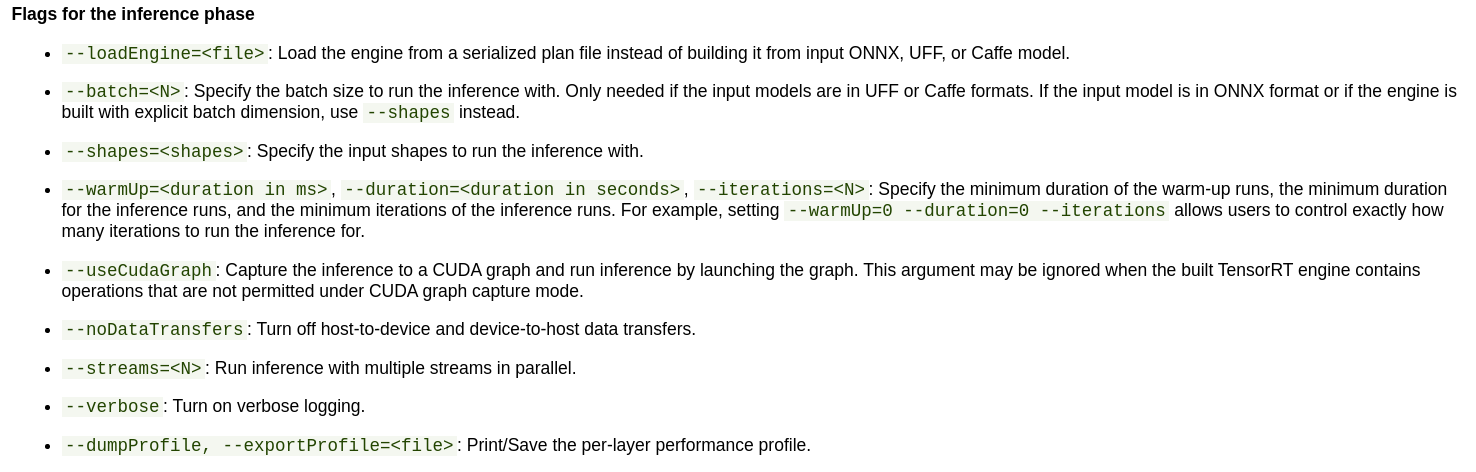
TensorRTPractice
version 8.2.0
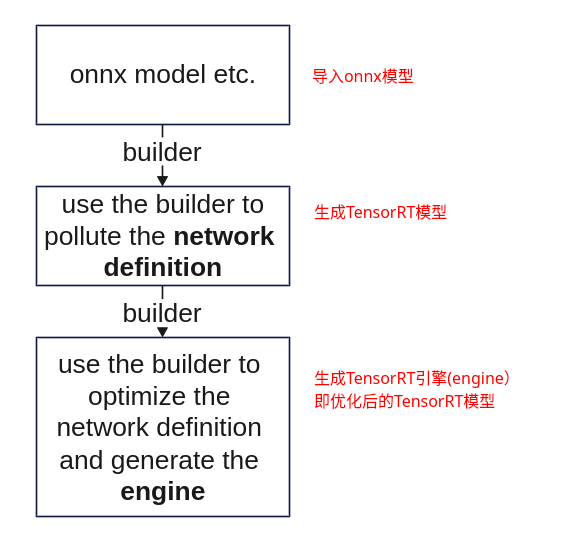
workflow
步骤一:创建logger对象,用于捕获TensorRT运行时的日志
步骤二:创建builder对象,构建TensorRT模型
步骤三:创建config对象,用于指导TensorRT的优化方式
步骤四:创建paser对象,将onnx模型的权值populate到TensorRT模型中
步骤五:创建context对象,进行预测
#include "NvInferRuntime.h"
#include <NvInfer.h>
// create a config object
nvinfer1::IBuilderConfig* config = builder->createBuilderConfig();

// network->plan->engine
nvinfer1::IHostMemory *plan = builder->buildSerializedNetwork(*network, *config);
nvinfer1::IRuntime* runtime = nvinfer1::createInferRuntime(logger);
nvinfer1::ICudaEngine *engine = runtime->deserializeCudaEngine(plan->data(), plan->size(), nullptr);

// network->engine
nvinfer1::ICudaEngine *engine = builder->buildEngineWithConfig(*network, *config

// engine->context
nvinfer1::IExecutionContext *context = engine->createExecutionContext();
logger:logger是共用的

命令行操作
trtexec
各种option的含义可参考here和
trtexec -h的输出
trtexec --onnx=fcn-resnet101.onnx --fp16 --workspace=64 \
--minShapes=input:1x3x256x256 \
--optShapes=input:1x3x1026x1282 \
--maxShapes=input:1x3x1440x2560 \
--buildOnly \
--saveEngine=fcn-resnet101.engine
--explicitBatch
--buildOnly:不需要inference performance measurements
--saveEngine: 模型导出
--verbose: 显示详细日志(会增加engine构建时间)
e.g.
trtexec --onnx=pfe_baseline32000.onnx --fp16 --workspace=16384 --saveEngine=pfe_baseline_fp16.engine
trtexec --onnx=rpn_baseline.onnx --fp16 --workspace=16384 --saveEngine=rpn_baseline_fp16.engine
TensorRT plugin
要让plugin能在TensorRT中使用需要先创建plugin,然后实例化一个plugin creator,然后将
migration
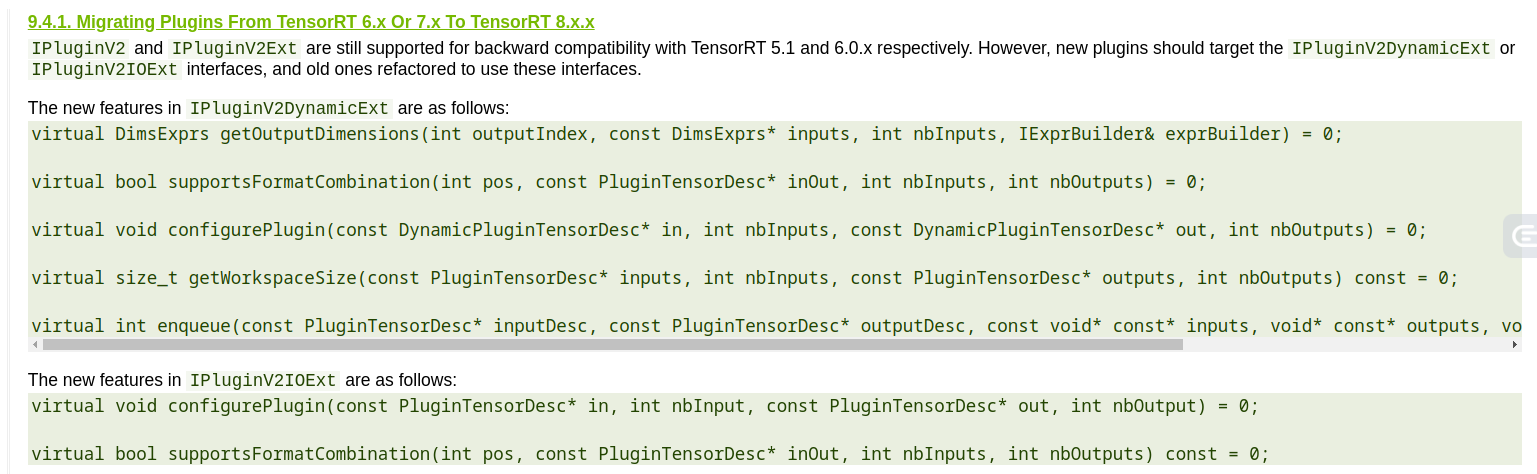
IpluginExt/IPlugin->IPluginV2

添加noexcept specifier

plugin为TensorRT的精髓,提供了一个接口进行自定义算子的导入
PlugininCreator注册
继承基类
class BarPlugin : public IPluginV2DynamicExt
{
 ...override virtual methods inherited from IPluginV2DynamicExt.
};
不同shape的基类

IPluginV2 -> IPluginV2DynamicExt;
IPluginV2Ext -> IPluginV2IOExt
template <typename T>
void write(char*& buffer, const T& val) const noexcept
{
    *reinterpret_cast<T*>(buffer) = val;
    buffer += sizeof(T);
}

template <typename T>
T read(const char*& buffer) const noexcept
{
    T val = *reinterpret_cast<const T*>(buffer);
    buffer += sizeof(T);
    return val;
}
DEBUG
未成功导入头文件NvInfer.h: No such file or directory
.../.../inference_helper_tensorrt.cpp:30:10: fatal error: NvInfer.h: No such file or directory
   30 | #include <NvInfer.h>
      |          ^~~~~~~~~~~
error: ‘class nvinfer1::IBuilder’ has no member named ‘buildSerializedNetwork’
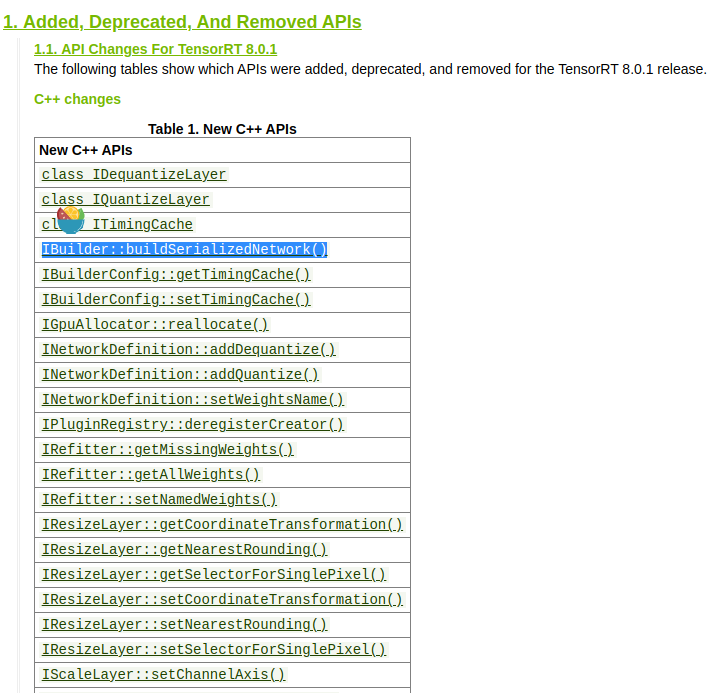
TensorRT版本号不对应:原使用了TensorRT 7.2.3的库,而以下的成员函数是从8.0.1开始才有的
Q&A
多流为什么有效?
CPU->GPU数据是经过PCIe总线进行传输的。在传输过程中,CPU和GPU处于空闲的等待状态。多流则可以实现数据传输与核函数计算的并行。
多流可以让多个核函数同时计算,充分利用GPU算理
备注
流并非越多越好,GPU内可同时执行的流数量是有限的
备注
GOU流指的是GPU操作(operation)序列(sequence)
为什么plan(TensorRT模型文件)不能够在不同架构下运行?
架构:e.g. Turing架构(RTX 2060)、Pascal架构(GTX 1080)
但可在相同架构的不同显卡下运行
备注
Serialized engines are not portable across platforms or TensorRT versions. Engines are specific to the exact GPU model they were built on (in addition to the platform and the TensorRT version).
TensorRT的输入为什么要固定?
为什么要调用setmaxbatchsize?对输入定死后才能够进行模型的调优?
TensorRT的调优策略?
该部分耗时是最长的。涉及:模型转换、kernel自动调优、算子融合和低精度
kernel自动调优:不需要考虑分支(能解释不同plan)
常用的设置参数
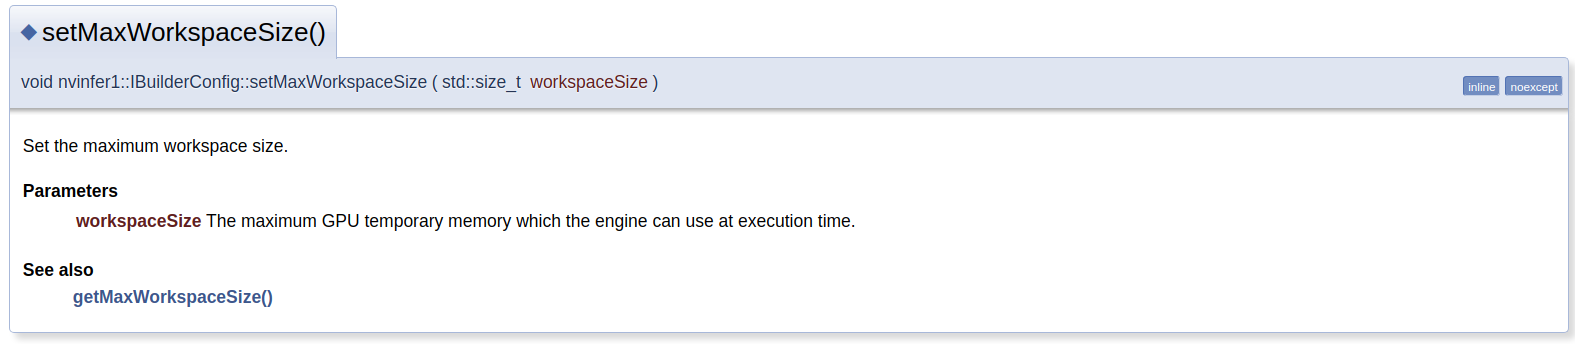
setMaxWorkspaceSize():执行时的显存用量
// IBuilderConfig::setMaxWorkspaceSize
auto builder = nvinfer1::createInferBuilder(gLogger);
auto config = builder->createBuilderConfig();
// config->setMaxWorkspaceSize(128*(1 << 20)); // 128 MiB

config->setMaxWorkspaceSize(16_MiB);
config->setMaxWorkspaceSize(5_GiB);
备注
One important property is the maximum workspace size. Layer implementations often require a temporary workspace, and this parameter limits the maximum size that any layer in the network can use. If insufficient workspace is provided, it is possible that TensorRT will not be able to find an implementation for a layer.
备注
some tatics do not have suffiient workspace memory to run. Increasing workspace size may increase performance, please check verbose output.

Change the workspace size:太低将得到次优的模型
精度配置
config->setFlag(BuilderFlag::kFP16);
config->setFlag(BuilderFlag::kINT8);
NOTE
程序中binding的意思?
存储输入输出内存地址的数组(An array of pointers to input and output buffers for the network),所以单输入单输出的一般的nbBindinds=2
int nbBindings = engine->getNbBindings();
std::vector<void *> mTrtCudaBuffer;
std::vector<int64_t> mTrtBindBufferSize;
mTrtCudaBuffer.resize(nbBindings);
mTrtBindBufferSize.resize(nbBindings);
TensorRT版本的选择
选择LTS版本的,例如能选7.2就不要选7.0和7.1
根据显卡来选TensorRT的版本。并不是版本更好越新越好,版本越新仅是对新的显卡优化效果更好,旧的效果反而效果会差一些。(软件TensoRT每次的优化和迭代都是与推出的N卡息息相关)
验证TensorRT engine
命令行测试
trtexec --shapes=input:32000x64 --loadEngine=pfe_baseline32000.trt
input大小可参考上一节:查看onnx模型的输入和输出大小
不同execute方法的区别
异步还是同步

静态batch还是动态batch

为什么重载的getworkspace返回0
By setting it to 0, the builder will use the workspace size set by builder->setMaxWorkspaceSize().
术语
序列化:序列化模型能够更好的存储模型
network definition:TensorRT中model的别称
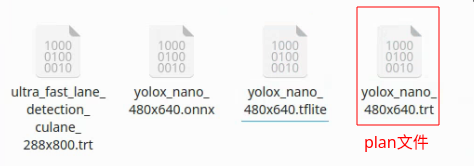
plan:序列化后的优化模型(inference model)/TensorRT导出的模型 - An optimized inference engine in a serialized format.
engine:被TensorRT builder优化好的模型(model)
In CUDA, the host refers to the CPU and its memory, while the device refers to the GPU and its memory. Code run on the host can manage memory on both the host and device, and also launches kernels which are functions executed on the device.
debug/logger
测时间
cudaEvent_t start_, stop_;
cudaStream_t stream_ = 0;
CHECK_CUDA_ERROR(cudaEventCreate(&start_));
CHECK_CUDA_ERROR(cudaEventCreate(&stop_));

CHECK_CUDA_ERROR(cudaEventDestroy(start_));
CHECK_CUDA_ERROR(cudaEventDestroy(stop_));

#if PERFORMANCE_LOG
  float generateFeaturesTime = 0.0f;
  CHECK_CUDA_ERROR(cudaEventRecord(start_, stream_));
#endif

#if PERFORMANCE_LOG
  CHECK_CUDA_ERROR(cudaEventRecord(stop_, stream_));
  CHECK_CUDA_ERROR(cudaEventSynchronize(stop_));
  CHECK_CUDA_ERROR(cudaEventElapsedTime(&generateFeaturesTime, start_, stop_));
  std::cout<<"TIME: generateVoxels: "<< generateVoxelsTime <<" ms." <<std::endl;
  std::cout<<"TIME: generateFeatures: "<< generateFeaturesTime <<" ms." <<std::endl;
  std::cout<<"TIME: doinfer: "<< doinferTime <<" ms." <<std::endl;
  std::cout<<"TIME: doPostprocessCuda: "<< doPostprocessCudaTime <<" ms." <<std::endl;
#endif
备注
event可重复赋值
查看引擎结构/profiler
需要trt8.2.0+

#include <NvInferRuntime.h>
#include <fstream>

auto inspector = std::unique_ptr<IEngineInspector>(engine->createEngineInspector());
// OPTIONAL
inspector->setExecutionContext(context);

// 特定层的信息
std::cout << inspector->getLayerInformation(0, LayerInformationFormat::kJSON);
// "Reformatting CopyNode for Input Tensor 0 to node_of_410 + node_of_411 + PWN(node_of_412)"

// 输出所有层的信息
std::cout << inspector->getEngineInformation(LayerInformationFormat::kONELINE);

// 重定向到文件中
std::ofstream engine_log;
engine_log.open("engine_log.json",ios_base::out);
engine_log << inspector->getEngineInformation(LayerInformationFormat::kJSON) <<endl;
engine_log.close();
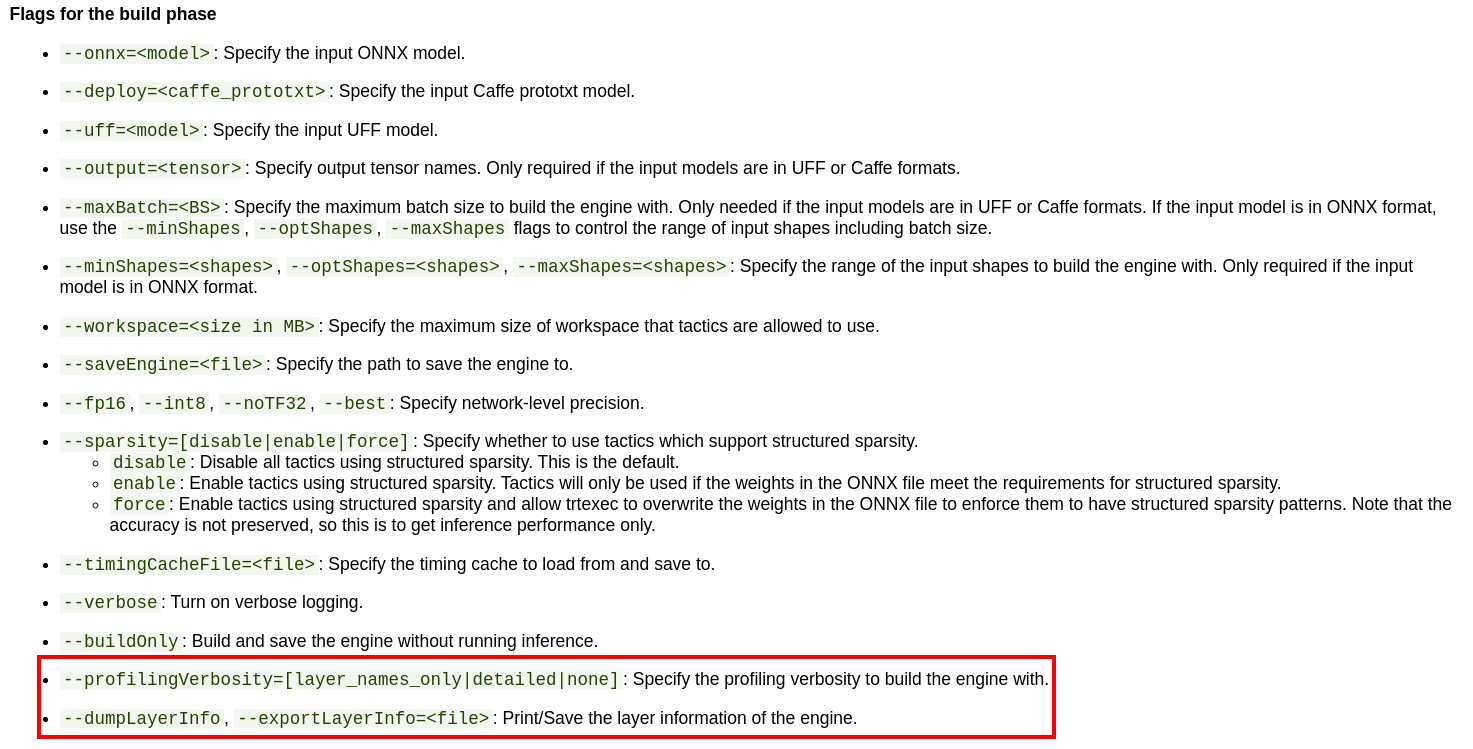
若要查看详细的debug信息需要在构建引擎时,添加
// ProfilingVerbosity::kLAYER_NAMES_ONLY or ProfilingVerbosity::kDETAILED
config->setProfilingVerbosity(ProfilingVerbosity::kDETAILED);
CLI工具
build phase
trtexec --onnx=model.onnx --fp16 --workspace=1200--saveEngine=plan.trt --buildOnly --exportLayerInfo=debug_profile.json --profilingVerbosity=detailed
infer phase
trtexec --loadEngine=plan.trt --dumpProfile --exportProfile=debug_profile.json
option:
--dumpOutput: 丢进去一个输入,给出一个输出结果到终端
--exportOutput=:同上(重定向到文件)
logger
/**
* @brief: 实例化一个ILogger接口类来捕获TensorRT的日志信息
*/
class Logger : public nvinfer1::ILogger {
public:
// void log(Severity severity, const char *msg)
void log(Severity severity, const char *msg) noexcept {
// 设置日志等级
if (severity <= Severity::kWARNING) {
timePrefix();
std::cout << severityPrefix(severity) << std::string(msg) << std::endl;
}
}
private:
static const char *severityPrefix(Severity severity) {
switch (severity) {
case Severity::kINTERNAL_ERROR:
return "[F] ";
case Severity::kERROR:
return "[E] ";
case Severity::kWARNING:
return "[W] ";
case Severity::kINFO:
return "[I] ";
case Severity::kVERBOSE:
return "[V] ";
default:
// #include <cassert>
assert(0);
return "";
}
}
void timePrefix() {
std::time_t timestamp = std::time(nullptr);
tm *tm_local = std::localtime(×tamp);
std::cout << "[";
std::cout << std::setw(2) << std::setfill('0') << 1 + tm_local->tm_mon
<< "/";
std::cout << std::setw(2) << std::setfill('0') << tm_local->tm_mday << "/";
std::cout << std::setw(4) << std::setfill('0') << 1900 + tm_local->tm_year
<< "-";
std::cout << std::setw(2) << std::setfill('0') << tm_local->tm_hour << ":";
std::cout << std::setw(2) << std::setfill('0') << tm_local->tm_min << ":";
std::cout << std::setw(2) << std::setfill('0') << tm_local->tm_sec << "] ";
}
} logger;
// logger.log(<level>, "c_str")
捕获错误
// e.g.
auto network = std::unique_ptr<nvinfer1::INetworkDefinition>(builder->createNetworkV2();
if(!network){
 logger.log(...);
};
engine
导出引擎
精简版
#include <fstream>

void createAddSaveEngine(const std::string &input_file,
                   const std::string &output_file) {
  using namespace nvinfer1;
  // step1:create builder
  IBuilder *builder = createInferBuilder(logger);
  // step2: creatr config for guiding trt to optimize the model
  IBuilderConfig *config = builder->createBuilderConfig();
  // step3: set parameter
  config->setFlag(nvinfer1::BuilderFlag::kTF32); // kFP16
  config->setMaxWorkspaceSize(5 * (1 << 30));
  const auto explicitBatch =
      1U << static_cast<uint32_t>(
          nvinfer1::NetworkDefinitionCreationFlag::kEXPLICIT_BATCH);
  // step4: create network(the model from the perspective of the trt)
  INetworkDefinition *network = builder->createNetworkV2(explicitBatch);
  // step5: populate trt network with onnx weight
  nvonnxparser::IParser *parser = nvonnxparser::createParser(*network, logger);
  parser->parseFromFile(input_file.c_str(),
                        static_cast<int>(Logger::Severity::kWARNING));
  // step6: build the engine
  nvinfer1::IHostMemory *plan =
      builder->buildSerializedNetwork(*network, *config);
  std::ofstream plan_file(output_file, std::ios::binary);
  plan_file.write(static_cast<char *>(plan->data()), plan->size());
}

void invoke()
{
    std::string input_file = "model.onnx";
    std::string plan_file = "plan.trt";
    std::ifstream fs(plan_file);
    if (!fs.is_open()) {
        std::cout << "Could not find " << plan_file.c_str()
            << " try making TensorRT engine from onnx model";
        createAddSaveEngine(input_file, plan_file);
    }
}
parser->parseFromFile() is a function which allows building and serialization of a network without and this api comes from tensorrt 8.0.1
智能指针版
void createAddSaveEngine(const std::string &input_file,
                   const std::string &output_file) {
  using namespace nvinfer1;
  // step1:create builder
  auto builder =
      std::unique_ptr<IBuilder>(createInferBuilder(logger));
  if (!builder) {
    std::cout << "Fail to create builder" << std::endl;
    assert(0);
  }
  // step2: creatr config for guiding trt to optimize the model
  auto config = std::unique_ptr<IBuilderConfig>(builder->createBuilderConfig());
  if (!config) {
    std::cout << "Fail to create config" << std::endl;
    assert(0);
  }
  // step3: set parameter
  config->setFlag(BuilderFlag::kTF32); // kFP16
  config->setMaxWorkspaceSize(5 * (1 << 30));
  const auto explicitBatch =
      1U << static_cast<uint32_t>(
          NetworkDefinitionCreationFlag::kEXPLICIT_BATCH);
  // step4: create network(the model from the perspective of the trt)
  auto network = std::unique_ptr<INetworkDefinition>(
      builder->createNetworkV2(explicitBatch));
  if (!network) {
    std::cout << "Fail to create network" << std::endl;
    assert(0);
  }
  // step5: populate trt network with onnx weight
  auto parser = std::unique_ptr<nvonnxparser::IParser>(
      nvonnxparser::createParser(*network, logger));
  if (!network) {
    std::cout << "Fail to create parser" << std::endl;
    assert(0);
  }
  parser->parseFromFile(input_file.c_str(),
                        static_cast<int>(Logger::Severity::kINFO));
  /* This function allows building and serialization of a network without
   * creating an engine note: this api from tensorrt 8.0.1 */
  // step6: build the engine
  nvinfer1::IHostMemory *plan =
      builder->buildSerializedNetwork(*network, *config);
  if (!plan) {
    std::cout << "Fail to create plan" << std::endl;
    assert(0);
  }
  std::ofstream plan_file(output_file, std::ios::binary);
  plan_file.write(static_cast<char *>(plan->data()), plan->size());
  std::cout << std::string("\033[1;36m") << std::string("save engine: ")
            << output_file << " successfully\033[0m" << std::endl;
}

void invoke()
{
    std::string input_file = "model.onnx";
    std::string plan_file = "plan.trt";
    std::ifstream fs(plan_file);
    if (!fs.is_open()) {
        std::cout << "Could not find " << plan_file.c_str()
            << " try making TensorRT engine from onnx model";
        createAddSaveEngine(input_file, plan_file);
    }
}
备注
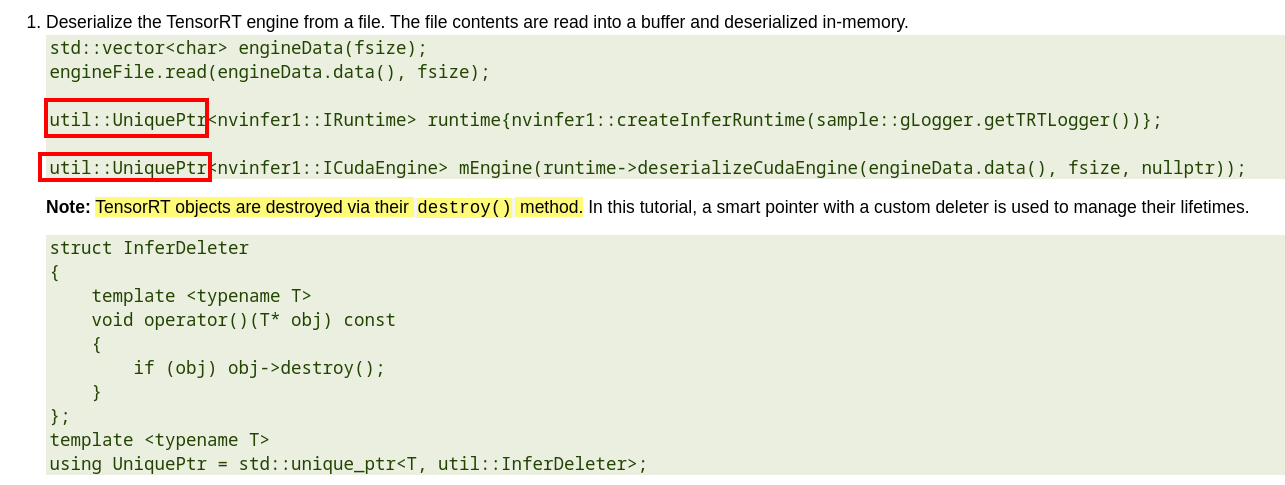
TensorRT的一些对象的销毁原本采用`object->destroy()`的方式进行销毁,现在建议采用`delete object`,或交由智能指针管理
其他
可添加该函数块,让工作空间设置的代码更具可读性
setMaxWorkspaceSize(5_GiB)
constexpr long double operator"" _GiB(long double val) {
  return val * (1 << 30);
}
constexpr long double operator"" _MiB(long double val) {
  return val * (1 << 20);
}
constexpr long double operator"" _KiB(long double val) {
  return val * (1 << 10);
}

// These is necessary if we want to be able to write 1_GiB instead of 1.0_GiB.
// Since the return type is signed, -1_GiB will work as expected.
constexpr long long int operator"" _GiB(unsigned long long val) {
  return val * (1 << 30);
}
constexpr long long int operator"" _MiB(unsigned long long val) {
  return val * (1 << 20);
}
constexpr long long int operator"" _KiB(unsigned long long val) {
  return val * (1 << 10);
}
导入引擎
nvinfer1::ICudaEngine *importEngine(const std::string &plan_file) {
  using namespace nvinfer1;
  std::fstream file(plan_file, std::ios::binary | std::ios::in);
  file.seekg(0, std::ios::end);
  int length = file.tellg();
  file.seekg(0, std::ios::beg);
  std::unique_ptr<char[]> data(new char[length]);
  file.read(data.get(), length);
  file.close();
  auto runtime = std::unique_ptr<IRuntime>(createInferRuntime(logger));
  if (!runtime) {
    std::cout << "Fail to create runtime" << std::endl;
    assert(0);
  }
  ICudaEngine *engine =
      runtime->deserializeCudaEngine(data.get(), length, nullptr);
  if (!engine) {
    std::cout << "Fail to deserialize engine" << std::endl;
    assert(0);
  }
  std::cout << std::string("\033[1;36m") << std::string("load tensorrt plan: ")
            << plan_file << " successfully\033[0m" << std::endl;
  return engine;
}

void invoke()
{
    std::string plan_file = "plan.trt";
    using namespace nvinfer1;
 auto engine = importEngine(plan_file);
}
layer
自定义层加入到网络
// 步骤一:在plugin registry中查找plugin creator
auto creator = getPluginRegistry()->getPluginCreator(pluginName, pluginVersion);
const PluginFieldCollection* pluginData = creator->getFieldNames();
// 步骤二:TODO:populate pluginData with data
// 步骤三:create the plugin object using the layerName and the plugin meta data
IPluginV2 *pluginObj = creator->createPlugin(layerName, pluginData);
// 步骤四:add the plugin to the TensorRT network
auto layer = network.addPluginV2(&inputs[0], int(inputs.size()), pluginObj);
plugin->register plugin creator (plugin factor) to expose the layer to TensorRT->add plugin to network
要使用自定义的plugin需要借助plugin工厂类(plugin creator)来注册(register)到TensorRT中,而不能直接注册
expose plugin creator
方法一:调用API
#inclue "NvInferRuntime.h"
// Register a plugin creator.
getPluginRegistry()->registerCreator(IPluginCreator &creator, AsciiChar const *const pluginNamespace)
方法二:使用宏
#inclue "NvInferRuntime.h"
#define REGISTER_TENSORRT_PLUGIN(<plugin_name>)
#e.g.
REGISTER_TENSORRT_PLUGIN(EmbLayerNormVarSeqlenPluginHFaceCreator);
REGISTER_TENSORRT_PLUGIN(EmbLayerNormVarSeqlenPluginMTronCreator);
REGISTER_TENSORRT_PLUGIN(SkipLayerNormPluginDynamicCreator);
REGISTER_TENSORRT_PLUGIN(SkipLayerNormVarSeqlenPluginCreator);
注意
TensorRT7.2.3的话,其宏放置于"NvInferRuntimeCommon.h"中
employ plugin creator
#inclue "NvInferRuntime.h"
// Return all the registered plugin creators and the number of registered plugin creators. Returns nullptr if none found.
getPluginRegistry()->getPluginCreatorList (int32_t *const numCreators)

// Return plugin creator based on plugin name, version, and namespace associated with plugin during network creation.
getPluginRegistry()->getPluginCreator (AsciiChar const *const pluginName, AsciiChar const *const pluginVersion, AsciiChar const *const pluginNamespace="")
NOTE
getPluginRegistry(): 返回一个指向plugin registry对象的指针(全局变量)
层级精度控制
将某些层用fp16表征时会出现溢出(overflow/underflow)的问题,因此可以找到对应的层然后不对其进行FP16的优化。调试方法可参考here
在pytorch中溢出的话会显示
tensor(inf, dtype=torch.float16)
/*
 * to do sth
 */
config->setFlag(BuilderFlag::kPREFER_PRECISION_CONSTRAINTS);

/*
 * to do sth
 */
int begin = 0;
int end = network->getNbLayers(); // get number of layers
for (int i = begin; i < end; i++) {
    auto layer = network->getLayer(i);
    std::string layerName = layer->getName();
    std::cout << "process " << layerName << std::endl;
    auto layer_type = layer->getType();
    auto layer_precision = layer->getPrecision();
    // skip some layer that can not use fp16
    if (layer_type == nvinfer1::LayerType::kSHAPE || layer_type == nvinfer1::LayerType::kIDENTITY || layer_type == nvinfer1::LayerType::kSHUFFLE || layer_type == nvinfer1::LayerType::kSLICE || layer_type == nvinfer1::LayerType::kCONCATENATION) {
        continue;
    }
    if (layer_precision == nvinfer1::DataType::kINT32) {
        continue;
    }
    if (layerName == "Tile") {
        continue;
    }
    // set FP32 for the layer
    layer->setPrecision(nvinfer1::DataType::kFLOAT);
    std::cout << "Set " << layerName << " to FP32 mode " << std::endl;
}
std::cout << "Set " << layerName << " to FP32 mode " << std::endl;
添加层到网络中并修改输出
使用API构建网络
auto builder = SampleUniquePtr<nvinfer1::IBuilder (nvinfer1::createInferBuilder(sample::gLogger.getTRTLogger()));

const auto explicitBatchFlag = 1U << static_cast<uint32_t>(nvinfer1::NetworkDefinitionCreationFlag::kEXPLICIT_BATCH);

auto network = SampleUniquePtr<nvinfer1::INetworkDefinition>(builder->createNetworkV2(explicitBatchFlag));

// 指定网络的输入
auto data = network->addInput(INPUT_BLOB_NAME, datatype, Dims4{1, 1, INPUT_H, INPUT_W});

// 添加卷积层:指定网络的输入作为当前卷积层的输出
auto conv1 = network->addConvolution(
*data->getOutput(0), 20, DimsHW{5, 5}, weightMap["conv1filter"], weightMap["conv1bias"]);
conv1->setStride(DimsHW{1, 1});

// 添加池化层
auto pool1 = network->addPooling(*conv1->getOutput(0), PoolingType::kMAX, DimsHW{2, 2});
pool1->setStride(DimsHW{2, 2});

// 添加fc和relu
auto ip1 = network->addFullyConnected(*pool1->getOutput(0), 500, weightMap["ip1filter"], weightMap["ip1bias"]);
auto relu1 = network->addActivation(*ip1->getOutput(0), ActivationType::kRELU);
auto prob = network->addSoftMax(*relu1->getOutput(0));

// 指定网络的输出
prob->getOutput(0)->setName(OUTPUT_BLOB_NAME);
network->markOutput(*prob->getOutput(0));
备注
Weights passed to TensorRT layers are in host memory.
Tensor具名机制
the code block ref here
给某个Tensor(e.g input/output Tensor)起名
const char* INPUT_BLOB_NAME = "data";
const char* OUTPUT_DET_NAME = "det_prob";
const char* OUTPUT_DA_NAME = "drivable_mask";
const char* OUTPUT_LANE_NAME = "lane_line_mask";

network->addInput(INPUT_BLOB_NAME, /*DataType*/ type, Dims dimensions})

// detection result
yolo_det->getOutput(0)->setName(OUTPUT_DET_NAME);
// Mark a tensor as a network output.
network->markOutput(*yolo_det->getOutput(0));

// drivable mask
da_out->getOutput(1)->setName(OUTPUT_DA_NAME);
network->markOutput(*da_out->getOutput(1));

// lane line mask
lane_out->getOutput(1)->setName(OUTPUT_LANE_NAME);
network->markOutput(*lane_out->getOutput(1));
起名可以在engine buffer中找到对应的bind(index)
const int inputIndex = engine->getBindingIndex(INPUT_BLOB_NAME);
const int outputIndex_det = engine->getBindingIndex(OUTPUT_DET_NAME);
const int outputIndex_da = engine->getBindingIndex(OUTPUT_DA_NAME);
const int outputIndex_lane = engine->getBindingIndex(OUTPUT_LANE_NAME);

//Create GPU buffers on device
CUDA_CHECK(cudaMalloc(&buffers[inputIndex], BATCH_SIZE * 3 * INPUT_H * INPUT_W * sizeof(float)));
CUDA_CHECK(cudaMalloc(&buffers[outputIndex_det], BATCH_SIZE * OUTPUT_DET_SIZE * sizeof(float)));
CUDA_CHECK(cudaMalloc(&buffers[outputIndex_da], BATCH_SIZE * OUTPUT_DA_SIZE * sizeof(float)));
CUDA_CHECK(cudaMalloc(&buffers[outputIndex_lane], BATCH_SIZE * OUTPUT_LANE_SIZE * sizeof(float)));
参考资料
内存管理
根据版本文档,原先使用destroy析构trt对象的方法可用delete来取代。意味着可以直接使用标准库的智能指针来管理tensorrt对象的析构,而不用使用自定义的智能指针。
Interface functions that provided a destroy function are deprecated in TensorRT 8.0. The destructors will be exposed publicly in order for the delete operator to work as expected on these classes.
自定义的智能指针:
utils
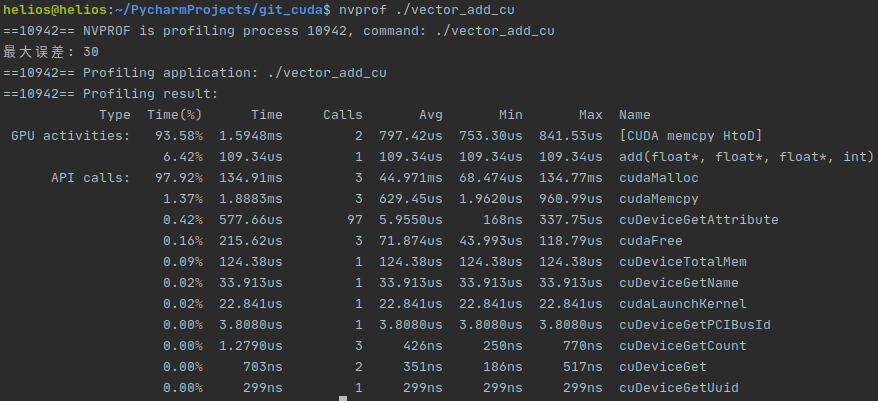
编译器:nvcc 调试器:nvcc-gdb 性能分析:nsight system, nvprof(deprecated), nvvp(deprecated) 函数库:cublas, nvblas, cusolver, cufftw, cusparse
nvvp/nvprof
cuda自带,便于不加代码的测性能和时间
图形化界面
nvvp -vm /usr/lib/jvm/java-8-openjdk-amd64/jre/bin/java
命令行工具
nvprof <executable file>
nsight system
安装
官网安装参考here,推荐deb包安装到系统
使用cuda自带的nsight
安装包
nsys-ui
or cuda自带的
nsight-sys
备注
实测最新版的2022.1.1可以自动停止运行profi
依赖设置
system's perf_event_paranoid level must be 2 or less. Use the following command to check:
cat /proc/sys/kernel/perf_event_paranoid
如果输出为>2,则执行如下命令行:
sudo sh -c 'echo kernel.perf_event_paranoid=2 > /etc/sysctl.d/local.conf'.
备注
Only pure 64-bit environments are supported. In other words, 32-bit systems or 32-bit processes running within a 64-bit environment are not supported.
https://www.bilibili.com/video/BV13w411o7cu?from=search&seid=4404768902520602634
实战DEBUG
TRT引擎输出的结果全为0(rangenet)
判断是否显存数据转移的问题:用trtexec来看输出结果是否全为0
调试n步曲
步骤一:参考官方教程

备注
已踩坑2(模型的输入应该为CHW,然后弄成了HWC)和坑3(16位数据溢出)