Network
Backend
Ubuntu服务器版和桌面版使用不同的后端(backend)管理网络,分别是
systemd-networkd(也称networkd)和network-manager(也称NetworkManger)netplan用于生成不同后端(networkd或NetworkManger)的配置文档
# 查看网卡状态
$ nmcli device status

# nmcli的connections即配置文档(ref: man)可在以下目录查看
$ ls /etc/NetworkManager/system-connections
# 查看配置信息
$ nmcli connection show
# 添加配置文档
# nmcli connection add type <ethernet/wifi> con-name <connection-name> ifname <interface-name>

# >>> 设置有线连接 >>>
# 静态ip配置
$ nmcli connection modify <connection_name>
ipv4.method manual \
ipv4.addresses 192.168.1.100/16 \
ipv4.gateway 192.168.1.1

# 动态ip配置
$ nmcli connection modify <connection_name> ipv4.method auto

# 使配置文档的修改生效
$ sudo systemctl restart NetworkManager
$ sudo nmcli connection reload

# >>> 设置无线连接 >>>
# 显示可连接的wifi信息/信号强弱
$ nmcli dev wifi

# 查看当前的wifi信息(如密码)
$ nmcli dev wifi show

# 连接wifi
# sudo nmcli dev wifi connect <wifi_ssid> password <password>
$ sudo nmcli dev wifi connect 877381 password 96899968

# >>> 图形化界面配置 >>>
$ nm-connection-editor

# >>> 拨号上网 >>>
$ sudo apt install pppoeconf
# starts up, shuts down or lists the log of PPP connections
$ sudo pon dsl-provider
# 断线
$ sudo poff
# 查看当前状态
$ plog
# 查看网卡状态
$ networkctl
# --debug项为可选(需放中间),用于查看日志
# 使配置文档生效
$ sudo netplan --debug apply
写在
/etc/netplan的配置文档的文件名需要以数字为前缀,如00-netplan.yaml实测,若在netplan中设置静态ip时一定要添加
nameserver,gateway(default为0.0.0.0/0)
DNS
ppp的DNS配置文档位于/etc/ppp/resolv
查看当前的DNS
(ubuntu 22.04) $ resolvectl dns
(ubuntu 22.04) $ resolvectl status
(ubuntu 20.04) $ systemd-resolve --status
查看DNS缓存
(ubuntu 22.04) $ resolvectl statistics
清除DNS缓存
(ubuntu 22.04) $ resolvectl flush-caches
查看域名是否正常解析
nslookup <domain_name>
nslookup www.baidu.com
nslookup <域名> <域名服务器IP地址>
阿里云 |
223.5.5.5 / 223.6.6.6 |
百度 |
180.76.76.76 |
腾讯 |
119.29.29.29 |
谷歌 |
8.8.8.8 |
dns的配置可以使用
nmcli,netplan, 在/etc/resolv.conf增加nameserver,或图形化界面上进行修改均可,不赘述/etc/resolv.conf的配置只起临时修改作用,重启后会恢复回原来的状态;使其生效需要
sudo apt install resolvconf
sudo service resolvconf restart
配置文档其余配置参数(e.g.
domain和search)可参考link
IP Confict
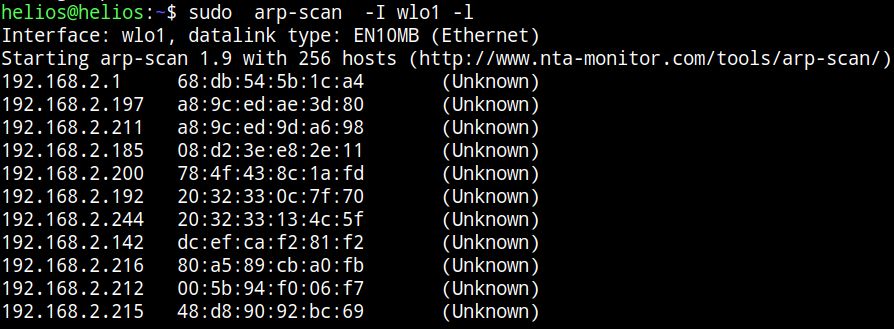
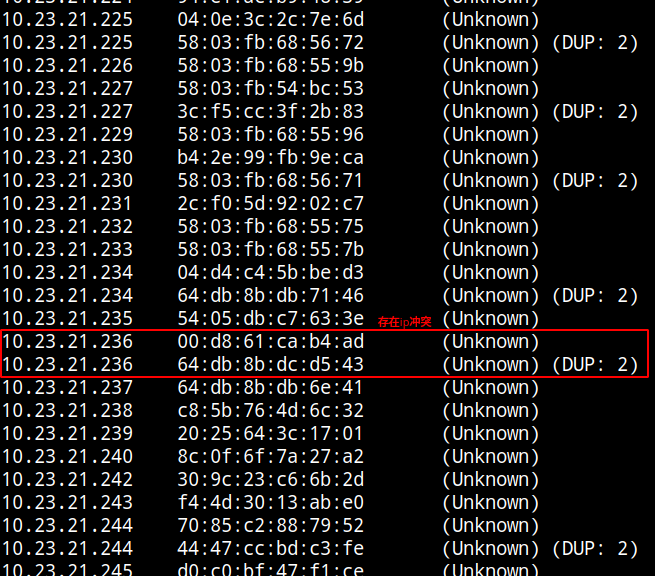
使用arp-scan来看ip是否冲突
sudo apt install arp-scan
sudo arp-scan -I <device_name> -l
sudo arp-scan -I wlo1 -l
-I 指定网卡设备
-l Generate addresses from network interface configuration
Hareware
查看网卡设备
sudo lshw -c network
启动网卡
查看网卡是否启动(看是down还是up)
ip link

link:network device
interface:网卡名(ref: man)
ip link set <网卡名interface> up/down
提示
网卡和其对应属性: eth/eno 一般对应有线网卡; elan/wlo 一般对应无线网卡;br一般与桥接有关
备注
DOWN 的情况有两种,一种是硬件上没联网(没插网线、没连wifi),二是软件上DOWN了(这种可以命令行UP回去)
Hostname
以下修改都是即刻生效的,无需重启服务
永久修改
sudo vim /etc/hosts
等价于
sudo hostnamectl set-hostname <new-hostname>
临时修改
sudo hostname <new-hostname>
Port
netstat
-a: all
-n:(numerical)显示数值型地址
-p:显示socket对应的pid和程序
-l:(listen)仅显示正在监听的sockets
-t: 列出tcp封包信息(一般与浏览器有关)
-u:列出utp封包信息
sudo netstat -anp | grep 32345
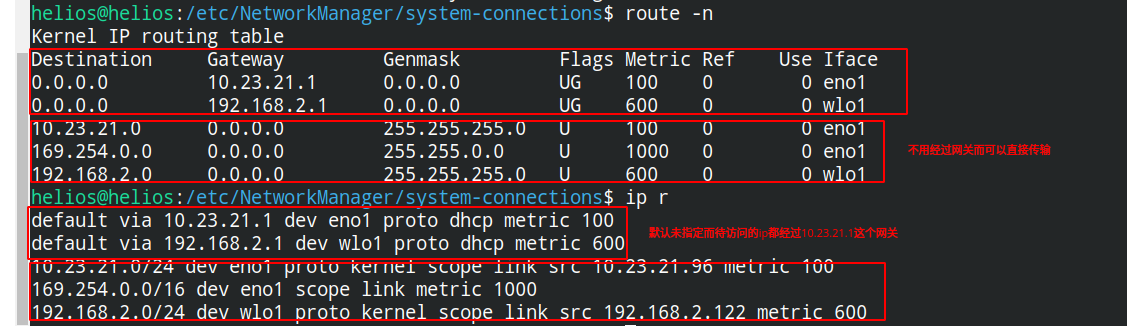
Route
显示静态路由表
以下给出三种方案
route -n
-n:不将ip解析为域名,能提高route命令行的速度
ip route
netstat -nr
Flags Possible flags include
         U (route is up)
         H (target is a host)  目标ip指向一台主机
         G (use gateway)
         R (reinstate route for dynamic routing)
         D (dynamically installed by daemon or redirect)
         M (modified from routing daemon or redirect)
         A (installed by addrconf)
         C (cache entry)
         ! (reject route)
屏蔽抵达某个ip的路由
sudo route add -net 10.23.21.110 netmask 255.255.255.255 reject
等价于:
sudo route add -host 10.23.21.110 reject
取消配置
sudo route del -net 10.23.21.110 netmask 255.255.255.255 reject
可由如下效果:

增设抵达某个ip的路由
指定抵达 172.16.1.* ip的路由:访问 172.16.1.* 需经过 192.168.43.1 这个网关
sudo route add -net 172.16.1.0 netmask 255.255.255.0 gw 192.168.43.1
路由跟踪
traceroute <ip/domain_name>
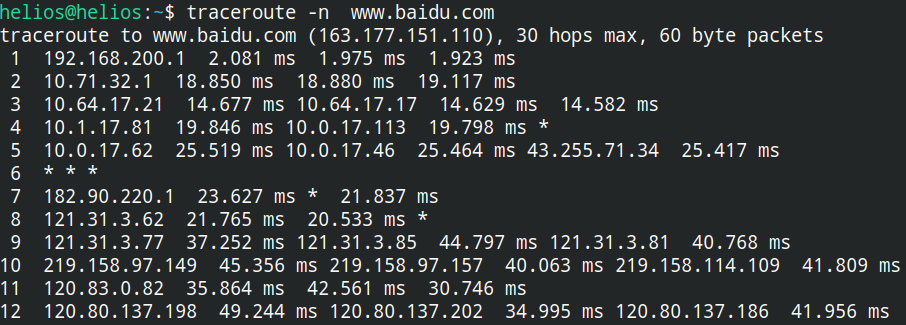
备注
数据先由当前无线网卡 192.168.200.123 广播到无线路由器 192.168.200.1 ,再经过...
V2raya
全局代理开启后,任何tcp流量都会经过代理
要主机作为网关,让其他主机或docker也使用代理,则需要开启局域网共享
安装
curl -Ls https://mirrors.v2raya.org/go.sh | sudo bash
sudo systemctl disable v2ray --now
wget -qO - https://apt.v2raya.org/key/public-key.asc | sudo tee /etc/apt/trusted.gpg.d/v2raya.asc
add V2RayA's repository
echo "deb https://apt.v2raya.org/ v2raya main" | sudo tee /etc/apt/sources.list.d/v2raya.list
sudo apt update
sudo apt update
install V2RayA
sudo apt install v2raya -y
sudo systemctl start v2raya.service
sudo systemctl enable v2raya.service
打开http://127.0.0.1:2017/进行配置(默认网站)
重设密码
sudo v2raya --reset-password
卸载v2ray和v2raya
步骤一:卸载v2ray(core)
sudo bash go.sh --remove
步骤二:若设置了自启动,还需删除相关service配置文件
sudo systemctl disable v2raya
步骤三:删除v2raya cookie
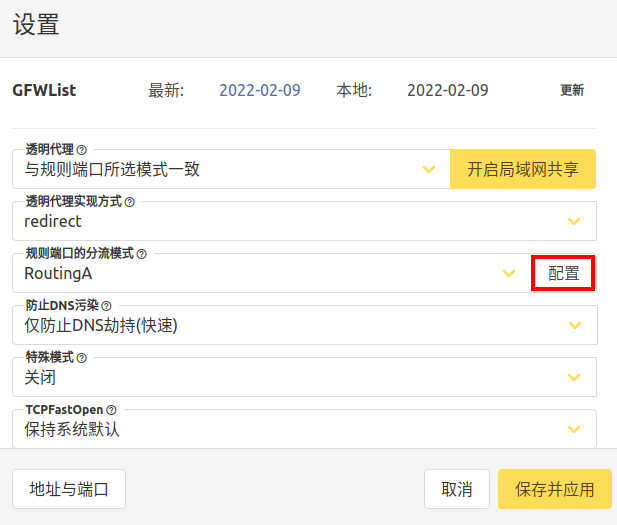
指定代理路由(routingA文档)
ieee设置直连而不进行代理
# GFWList模式
default: direct
# 学术网站
domain(geosite:google-scholar)->proxy
domain(geosite:category-scholar-!cn, geosite:category-scholar-cn)->direct
# domain(ext:"LoyalsoldierSite.dat:gfw", ext:"LoyalsoldierSite.dat:greatfire")->proxy
domain(geosite:geolocation-!cn)->proxy
Practice
实现同时收发激光雷达数据和上网
使用了激光雷达后无法使用无线上网:
路由规则(i.e. 描述数据传输的路径)不妥当。以下
路由规则为:目的地ip为192.168.1.*时使用有线网卡enp89s0进行广播;目的地ip为192.168.43.*时使用无线网卡wlp0s20f3进行广播;同理目的地ip为169.254.*.*时使用有线网卡enp89s0;其他目的地ip则使用metric最小的默认路由,相关的数据经过有线网卡enp89s0,传输到网关192.168.1.1(理论上应该是经过无线网卡wlp0s20f3,传输到网关192.168.43.1)
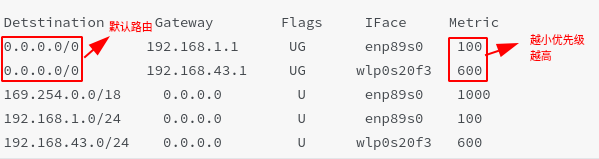
一种解决方案为,可以删除有线网卡的
默认路由,只保留无线网卡的默认路由,让有线网卡处理ip地址为192.168.1.*的传感器设备的数据收发,无线网卡访问因特网。换句话说:192.168.1.*的ip走有线网卡(收发激光雷达和相机的数据)。其他数据走无线网卡(收发互联网的数据),经192.168.43.1的网关
仅生效一次(重启会重置)
route del default enp89s0
route -n
Detstination      Gateway        Flags     Iace     Metric
0.0.0.0/0        192.168.43.1     UG      wlp0s20f3   600
169.254.0.0/18     0.0.0.0         U       enp89s0    1000
192.168.1.0/24     0.0.0.0         U       enp89s0    100
192.168.43.0/24    0.0.0.0         U      wlp0s20f3   600
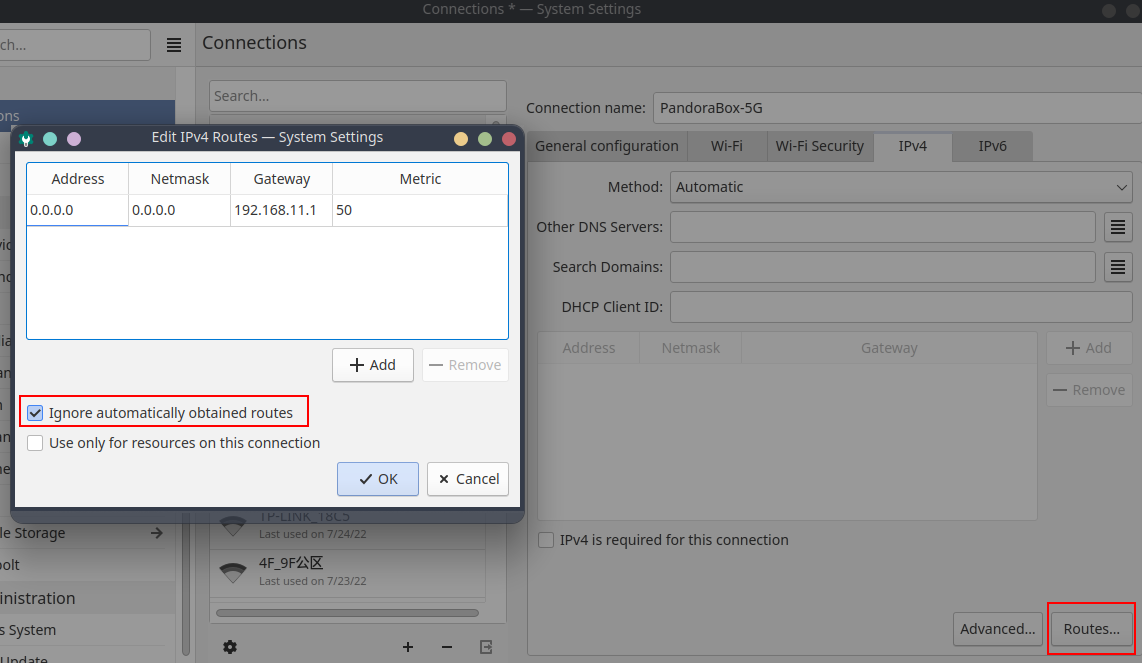
另一种解决方案是为无线网卡设置一个metric比有线网卡更低的路由(通过GUI修改后,需要重新连接;通过GUI还可以删除默认路由)。实测无法通过netplan进行覆盖,其只是追加路由规则。
解决子网重复
由于子网重复而无法ping通路由器的 192.168.1.1 可以指定路由进行连接
route -n
Detstination      Gateway        Flags     IFace     Metric
0.0.0.0/0        192.168.1.1      UG       wlp3s0    20600
169.254.0.0/18     0.0.0.0         U       enp4s0     1000
192.168.1.0/24     0.0.0.0         U       enp4s0     100
192.168.1.0/24     0.0.0.0         U       wlp3s0     600
sudo route add -host 192.168.1.1 wlp3s0
Detstination      Gateway        Flags     IFace     Metric
0.0.0.0/0        192.168.1.1      UG       wlp3s0    20600
169.254.0.0/18     0.0.0.0         U       enp4s0     1000
192.168.1.0/24     0.0.0.0         U       enp4s0     100
192.168.1.0/24     0.0.0.0         U       wlp3s0     600
192.168.1.1/32     0.0.0.0        UH       wlp3s0      0
Tool
CLI
监控特定网卡
sudo apt install ethstatus
ethstatus -i <inferface_name>
ethstatus -i eno1
设置限速(注意需要sudo,否则配置不生效)
sudo wondershaper 10000 10000
主要此处是bps,而不是Bps
sudo wondershaper <device_name> <下行速度bps> <上行速度bps>
取消限速 sudo wondershaper clear eno1
sudo wondershaper clear <device_name>
测速
sudo apt install speedtest-cli
speedtest-cli --bytes
Chrome Plugin
Link Redirect Trace:查看链接重定向